
diff options
Diffstat (limited to 'README.md')
| -rw-r--r-- | README.md | 96 |
1 files changed, 95 insertions, 1 deletions
@@ -1 +1,95 @@ -initial commit +# low_latency_layer + +A C++23 Vulkan layer that reduces click-to-photon latency via AMD's latency reduction technology. + +This layer was designed to maximise latency reduction without reducing FPS throughput. [Initial benchmarks are available here.](#benchmarks) + +# Features + +- **AMD Anti-Lag 2:** Greatly reduces latency by synchronising the GPU and CPU when input is collected. +- **AMD Anti-Lag 1:** Reduces latency by eliminating queueing using GPU and CPU timing data. + +# Planned + +- Anti-Lag 2's optional framerate Limit. +- Anti-Lag 1 & DXVK: The asynchronous nature of DXVK means that Anti-Lag 1 will not function correctly (unlike Anti-Lag 2, which works!). +- Improvements to the Anti-Lag 1 algorithm for more aggressive latency reduction. +- Improvements to logging and statistics so that special hardware isn't needed to verify the layer is functioning correctly. +- Cross-platform builds (time domain adjustments required). +- HUD with latency information. + +# Dependencies + +- [CMake](https://cmake.org): A cross-platform, open-source build system generator. +- [Vulkan Headers](https://github.com/KhronosGroup/Vulkan-Headers): Vulkan header files and API registry. +- [Vulkan Utility Libraries](https://github.com/KhronosGroup/Vulkan-Utility-Libraries): Library to share code across various Vulkan repositories. + +# Building from Source + +Clone this repo. + +``` + $ git clone https://git.nj3.xyz/low_latency_layer + $ cd low_latency_layer +``` + +Create an out-of-tree build directory (creatively we'll use 'build') and compile from source. + +> ⚠️ **WARNING:** You are likely going to have to install your distro's `vulkan-headers`, `vulkan-utility-libraries`, and possibly even `cmake` packages before proceeding. If you see an error here their absense is almost certainly the reason. + +``` + $ cmake -B build ./ + $ cd ./build + $ make +``` + +Provided nothing went horribly wrong you should find `libVkLayer_NJ3AHXAC_LowLatency.so` and `low_latency_layer.json` in the `build/out` directory. That's it! + +# Installation + +This layer interacts with the Vulkan Loader, which has to see the layer to inject it. [You can read about the many ways a layer can be discovered here](https://github.com/KhronosGroup/Vulkan-Loader/blob/main/docs/LoaderLayerInterface.md#layer-discovery). One way is to use the `VK_ADD_IMPLICIT_LAYER_PATH` env var to surgically add a location to where the loader looks. We're going to use this method. + +If you want to enable the layer globally and don't want to pollute your system with untracked files and shared libraries (recommended), you should append a line in your `/etc/environment` to point the loader to where you built the layer: + +``` + VK_ADD_IMPLICIT_LAYER_PATH="/the/prefix/to/your/cloned/repository/low_latency_layer/build/out/" +``` + +If you want to enable the layer only for a specific program on Steam you can just modify its launch options like so: +``` + VK_ADD_IMPLICIT_LAYER_PATH="/the/prefix/to/your/cloned/repository/low_latency_layer/build/out/" %command% +``` + +Keep in mind that if you use the first `/etc/environment` option, you might need to restart your session for it to take effect everywhere. + +# Anti-Lag 2 Usage + +Provided the loader has injected the layer and your GPU supports the extensions we need to function, the layer will provide the `VK_AMD_anti_lag` device extension. It's up to the application for what happens next. Typically you will see something about Anti-Lag in video settings - for example, in Counter Strike 2 you will see this: + + + +It's difficult for humans to detect differences in input latency without special hardware. In GPU heavy scenarios, Anti-Lag 2 should eliminate the 'sluggish' mouse feeling that cannot be explained by poor FPS. The input latency that this layer targets is insidious in that it may only become apparent at certain points during gameplay. Specifically, this happens when the GPU has much more work than the CPU, allowing the CPU to _run ahead_ of the GPU. + +If you need convincing that the layer is doing something and don't have access to special hardware, you can simply look at your framerate. With Anti-Lag 2 enabled, you should see a very slight reduction in throughput. Alternatively, you might notice a slight reduction in GPU utilisation. + +# Anti-Lag 1 Usage + +For games that do not support Anti-Lag 2, we provide the ability to use Anti-Lag 1. Unlike Anti-Lag 2, the application does not need to be aware of - or have a working implementation of - the technology to function correctly. It's a bit less robust, and its performance is almost certainly worse than Anti-Lag 2, but it has the advantage of being universally applicable. + +> ⚠️ **WARNING:** Anti-Lag 1 is not functioning correctly with DXVK. Do not expect it to work outside of native Linux games. + +Anti-Lag 1 is not enabled by default. Instead, an environment variable toggle is provided. This must be set to exactly the string `"1"` - all other values are ignored. + +``` + LOW_LATENCY_LAYER_SLEEP_AFTER_PRESENT="1" +``` + +If Anti-Lag 1 is enabled alongside Anti-Lag 2, Anti-Lag 2 will take priority. + +# Benchmarks + +## Counter-Strike 2 +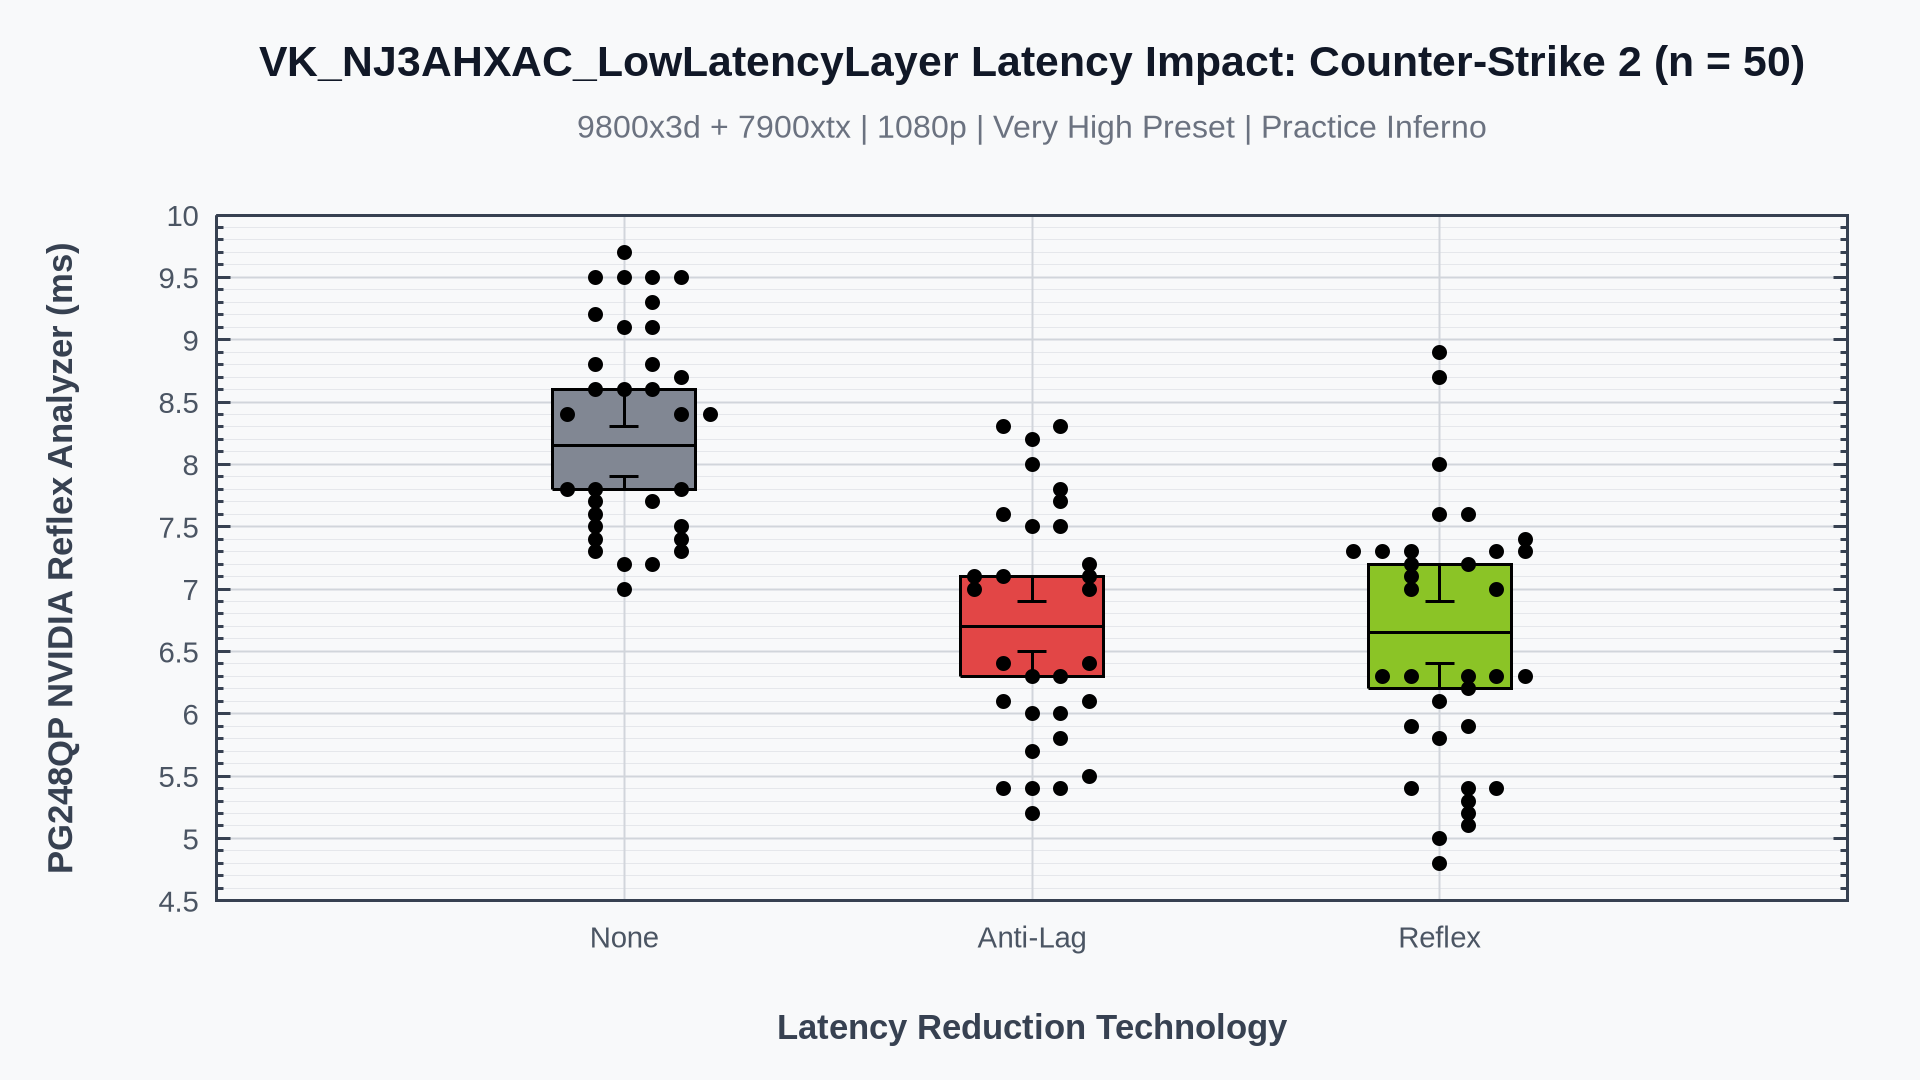 + +## The Finals + |